

January 20, 2013
Friendly Advice from the Pros:
Running seams of caulk is often one of the most overlooked stages of prepping a painting project. Along with priming, spackling, and sanding, caulking gaps and voids is just as vital a part of the process. It’s so important because it allows for clean and crisp transitions between wall sections, joints, and trim.
Only use painters’ caulk for painting-related sealing. There are many reputable brands to choose from, with quick-drying options and longevity of up to thirty-five years. Once you’ve made your selection, the only other gear you’ll need is a working caulk-gun, some clean rags, and tap water.
 Painters’ caulk is best applied to dry surfaces that have been removed of any leftover obstructions like old caulk or nails/screws. Old caulk can be gauged out with a flathead screwdriver or six-in-one painters’ tool. If the surface in need of caulking is too wet to dry out in good time, you can use a heat gun or even a blow-dryer to speed up the process. It’s also worth mentioning here that painters’ caulk should only be used to fill seams or voids less than ½-inch in width. Anything wider than that will require some kind of filler like a wooden shim or foam insulation.
Now, you’re ready to run some caulk. Insert your purchased tube of painters’ caulk into your caulk-gun and cut the nozzle/tip of the tub at a forty-five degree angle with a razor or utility knife to your desired width. The nozzle will have hash marks on it in quarter-inch intervals to make this a fairly simple process. A good rule of thumb is to cut your nozzle to the width that’s slightly larger than the majority of seams and voids you’re looking to fill.
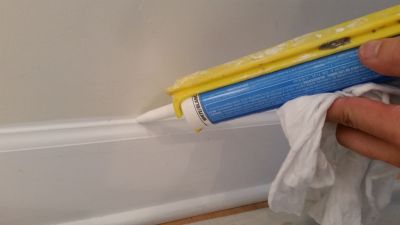
Next, press the nozzle of the caulk tube flush to the surface of application—the angled cut will get you right on top of flat surfaces, and as close as possible to ninety-degree angles (like between a window frame and the wall). Slowly squeeze the trigger of the caulk-gun until you see a pearl of caulk eject from the nozzle. Keep applying pressure to the trigger while slowly beginning to move the nozzle along the line or crack you need to fill. Apply pressure to the trigger with a force that matches the speed you’re going to traverse the crack or gap. If you squeeze too lightly and move too fast, that seam isn’t getting filled. Squeeze too hard and move too slow, and you’ll have large globs of caulk everywhere. A medium pace and pressure are key.
When you’ve completely filled the gap or crack, smooth it out with a clean, damp rag. Wet the rag entirely and ring out any excess, then simply use your index finger with the rag held over it to gently smooth over the bead of caulk you just ran. Work in the same direction that you applied the caulk, and don’t press too hard while doing so. Follow these steps, and in no time at all you’ll have professional looking transitions and seams in your home!